7. Ingress Tier#
7.1. Introduction#
As we saw in the previous chapter, having application containers running is not very useful if they are not able to receive and respond to HTTP requests. The ingress tier is responsible to accept incoming requests and route them to the correct runner and container for the application responsible for their handling.
The ingress tier is composed by two layers: an infrastructure layer ensuring that network traffic can correctly reach the Cloudspace and a routing layer that makes forwards requests to the appropriate containers.
The first layer is handled fully by the IaaS provider and takes care of performing load balancing at the TCP level. It guarantees high availability by being provisioned to two different availability zones and automatically handling failovers.
The second layer is composed by a custom OpenResty distribution that performs TLS termination and is able to dynamically make HTTP routing decisions based on data residing in a Redis database.
7.2. Network Load Balancing#
Let’s start setting up the infrastructure by going to the EC2 dashboard and selecting Target groups from the left sidebar.
We are going to create three target groups for HTTP, HTTPS, and SSH. The configuration for all three groups is the same, except for the name and the port, which are as follows:
divio-hackathon-runners-httpport 80divio-hackathon-runners-httpsport 443divio-hackathon-runners-sshport 2222
For each group click on Create target group and select Instances from as target type. Then enter the name, protocol, port, address type and VPC as shown below:
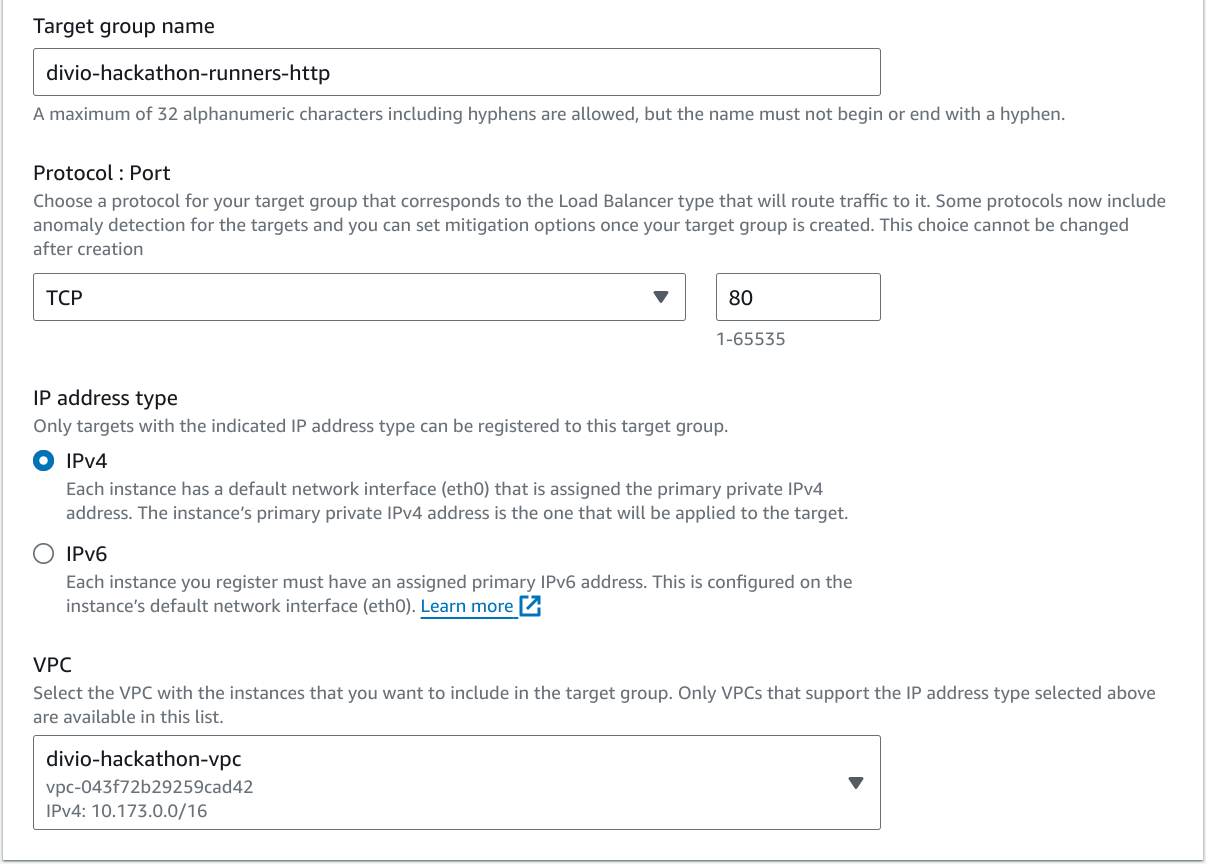
Next up expand the advanced configuration for the health checks and override the Health check port by setting it to 79. Set the Healthy threshold to 3 and the Interval to 10 seconds. You can leave the other settings as is.
Create the target group without adding any targets and repeat the same process to also create the HTTPS and SSH target groups.
Next up, we have to create the network loadbalancers. In this case we will create two of them: one for the HTTP and HTTPS endpoints (they will share the same static set of IPs), and one for the SSH endpoint.
To do so, click on Load balancers in the left sidebar, and then on Create Network Load Balancer from the dropdown on the right of the Create load balancer button.
Use divio-hackathon-http-nlb as the name, select your VPC and all
availability zones. Make sure to remove all security groups from the selection
and leave everything else except the listeners as is.
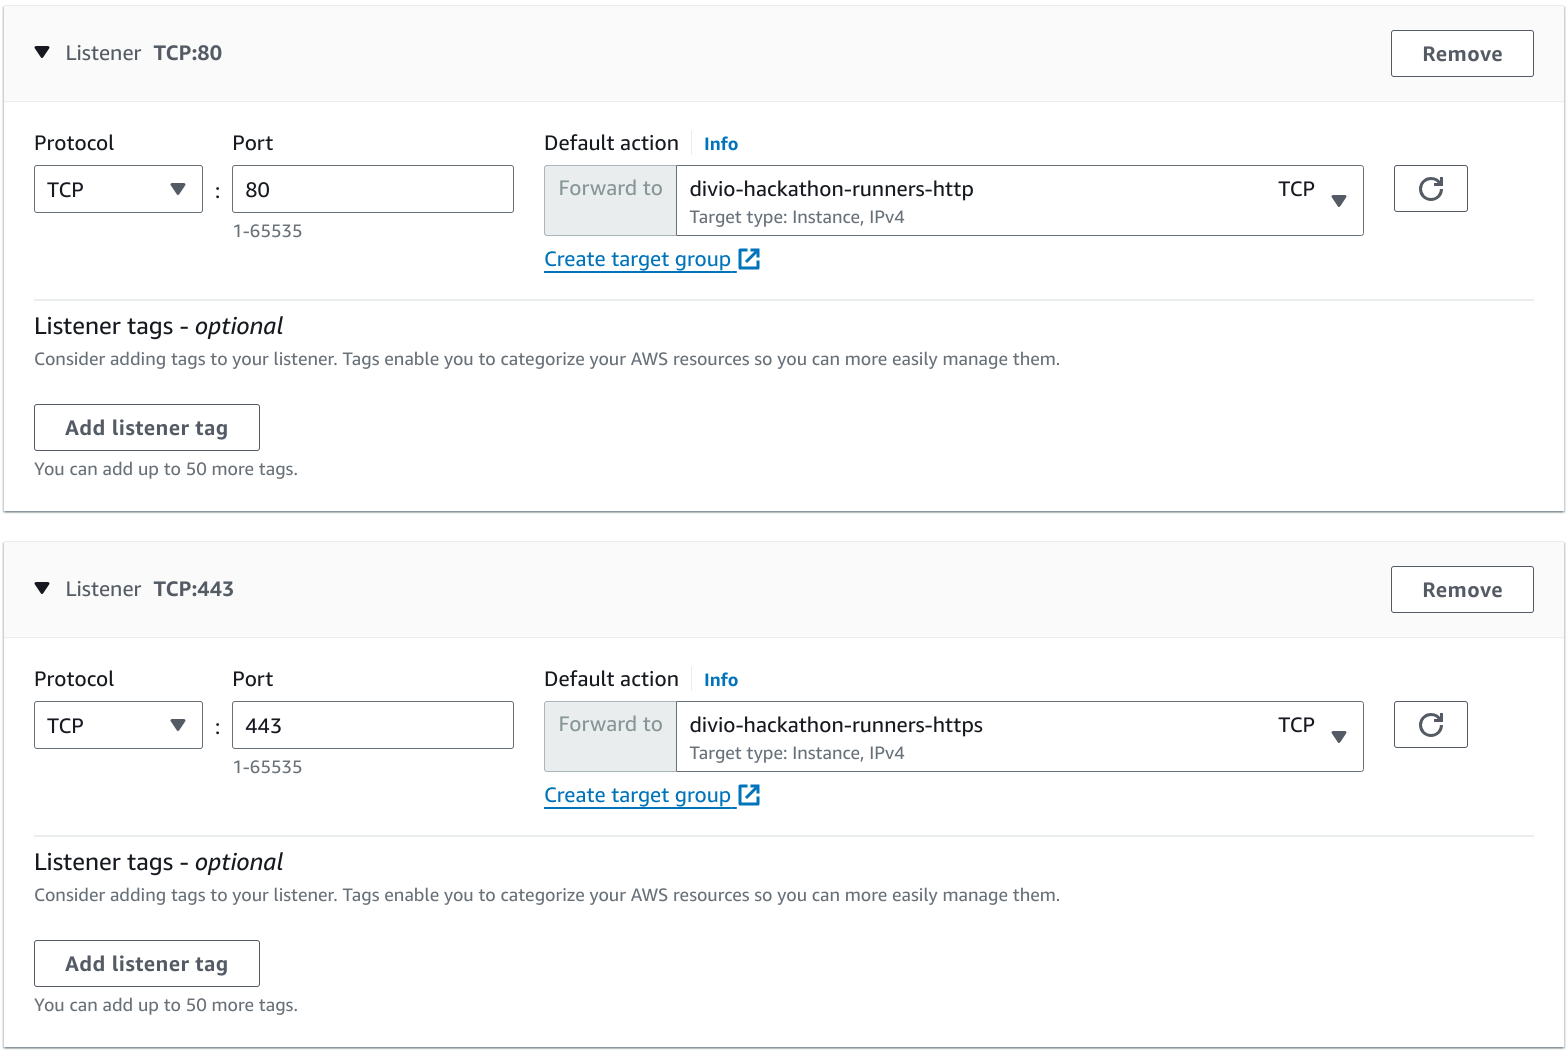
In the listeners section, make sure to create two TCP listeners, one for port 80 and one for port 443, forwarding traffic to the target groups we just created:
Go ahead and click on Create load balancer to finalize the creation.
You can now repeat the process for the SSH NLB, by adapting the name, and adding only one TCP listener for port 22.
Note
Security groups support for NLBs is a relatively new feature. We could explore if using them can allow us to improve our security posture.
Right now, the security groups of the targets are used for firewalling purposes, making for example the individual VMs accessible on their private interfaces from the applications running within the Cloudspace.
Note down the DNS Names for the two network load balancers and set up three DNS records on DNSimple:
Add an
CNAMErecord namedlb.hackathon-XX.aldryn.netpointing to the HTTP loadbalancer domain name with a TTL of 3600 seconds.Add a
ALIASrecord named*.hackathon-XX.aldryn.iopointing tolb.hackathon-XX.aldryn.netwith a TTL of 60 seconds.Add a
CNAMErecord namedssh.hackathon-XX.aldryn.netpointing to the SSH load balancer domain name with a TTL of 3600 seconds.
At this point, the necessary infrastructure should be ready, and the control panel should also be able to correctly validate the domain name for the application we created in the previous chapter and issue certificates for it.
Go to the domains admin, search for the domain of your application, open its detail page and, if a certificate has not yet been provisioned, click on the Check configuration action in the top right corner. Wait a couple of seconds and refresh the page to confirm that the setup has been validated.
Now you can go back to the domains listing page, select your domain, and execute the Renew certificates for the selected domains action from the dropdown. You might have to wait up to one minute for the process to complete.
Once the certificate for your application domain has been provisioned, you can trigger a new deployment to ensure that the certificate is also provisioned on the Cloudspace itself.
Note
Dennis, it looks like the vanity domains backend do not provision wildcard certs…
You are now ready to proceed to the next step.
7.3. Ingress Controllers#
In the previous section, we set up network load balancers that distribute traffic among a set of instances in a given target group. It is now time to add some instance to those groups.
Before we can deploy the ingress controllers, we have to create an SSH host key to be used by the proxy. To do so, issue the following commands:
mkdir ssh_host_keys/divio-hackathon-lb
ssh-keygen -t rsa -b 4096 -f ssh_host_keys/divio-hackathon-lb/id_rsa -N ''
Moreover, we have to instruct the SSH proxy to check user credentials against
control panel dev (instead of live). To do so, add the following lines to your
defaults file:
control_domain_override: control.dev.aldryn.net
Deploy two new ingress controllers (or routers, or load balancers):
ddt provision --deploy --count 2 divio-hackathon lb
Note
The ingress tier is one of the most critical components of a Cloudspace. To ensure a higher availability, on production Cloudspaces, we usually maintain four ingress controllers (two per availability zone).
Wait for the provisioning to complete, then head over first to the target groups on the AWS console to confirm that the new instances have been added to all three of them, and subsequently to the app controller admin interface to confirm that two new load balancer config stores have been automatically added and are marked as up to date.
Try to access your stateless application; it should now be reachable from both HTTP and HTTPS. You can also try to SSH into its containers by copying the command shown in the application dashboard on the control panel.