5. Application Controller#
5.1. Introduction#
The application controller (or app controller, or appctl) is the heart of a Cloudspace. It is a custom-built orchestrator that knows about all applications running in a Cloudspace and makes sure that the containers are scheduled correctly and that the ingress tier knows where to route the traffic to.
5.2. Provisioning a RDS Database#
The app controller service requires a database. Usually we maintain one database cluster for the Cloudspace-specific services (app controller and services API), and one cluster for the hosted applications.
We can set up a new cluster for the Cloudspace services via the RDS console. Navigate to the RDS console and click on Create database to start the database creation wizard.
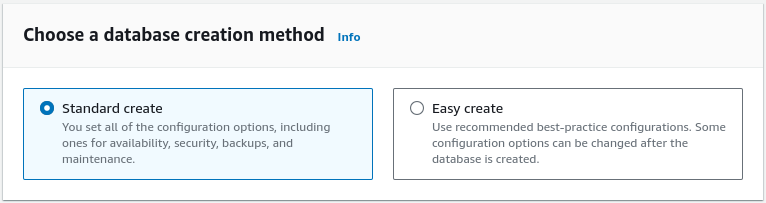
While the Easy create option gets most things right, we want to use the Standard create flow to further customize some options:
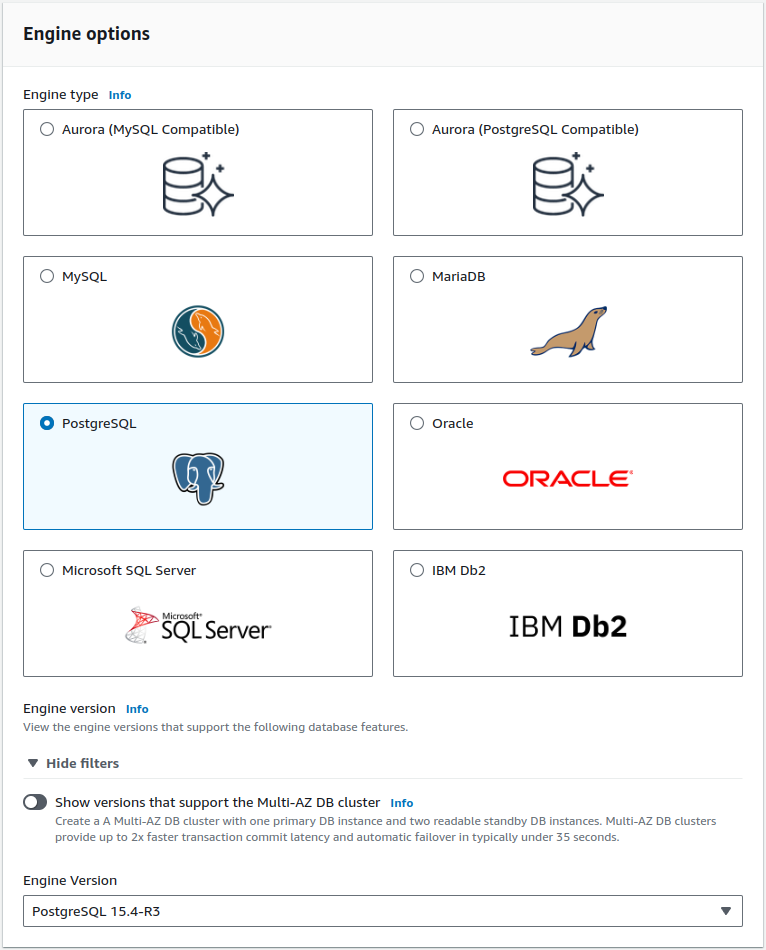
Select the latest Postgresql Version:
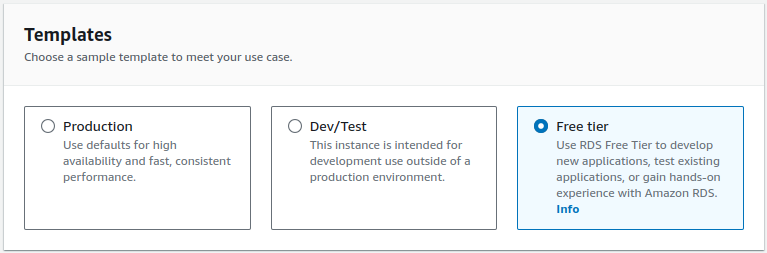
For the purposes of this guide, we can use the free tier offering:
Give it a proper name and let it autogenerate a password:

You can leave the default values for the instance and storage configuration.
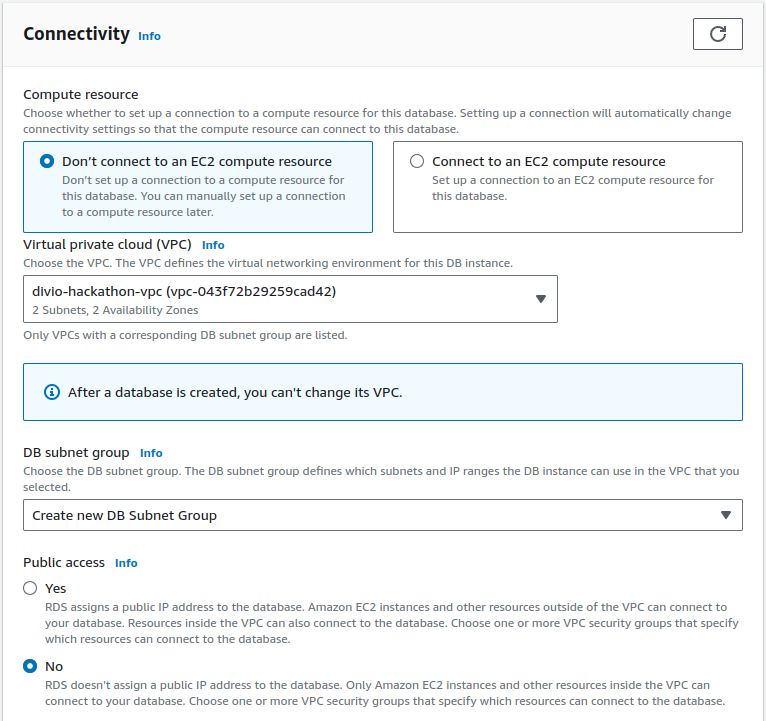
On the connectivity end, select your VPC, let it create a new DB subnet group, and disable public access:
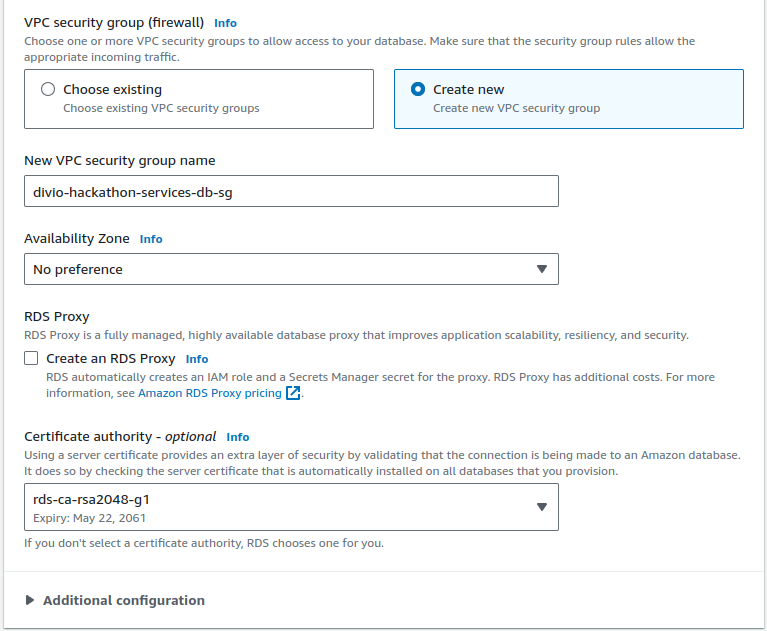
Further, set up a new VPC security group by giving it an appropriate name, and make sure to select a certificate authorithy with a long expiration time:
You can leave the default values for the monitoring and the additional configuration. On a production instance we would tune some settings like the backup retention period and the various maintenance windows.
Finally click on Create database and wait until the instance is ready. This operation can take anywhere between 5 and 20 minutes, depending on your settings.
In the meantime, you can save the database master credentials to the deployment repository. To do so you have to create a new encrypted vault to store sensitive data with the following command:
ansible-vault create --encrypt-vault-id development \
   platform/group_vars/divio-hackathon/vault
In the editor, you can add the following entry by retrieving the value from the View credentials button in the top right corner of the web console:
vault_support_db_root_password: <master password>
The next time you need to edit the vault file, you can do so with this command:
ansible-vault edit platform/group_vars/divio-hackathon/vault
Finally also set the default root user for the database by editing your
defaults file and adding the following:
support_db_root_user: postgres
Before continuing, we need to make sure that the newly create security group is set up correctly. First make sure all security groups are created:
ddt sync-role-sg divio-hackathon
Now you can go to the VPC dashboard, select Security groups from the left
sidebar, and you should see that all security groups have been created. Pick
the one with divio-hackathon-services-db-sg as Security group name and
copy the value also to the Name column which should still be empty. Then
click on it and switch to the Inbound rules tab in the lower half of the
screen. Click on Edit inbound rules and make sure that both the
divio-hackathon-appctl-sg and divio-hackathon-services-sg can open
connections on port 5432:

5.3. RabbitMQ Cluster#
Usually we use CloudAMQP (accessible via OneLogin) to set up RabbitMQ clusters. These clusters get deployed to the target AWS region where the Cloudspace also runs. For the purposes of this guide, a cluster is already set up and will be shared by all Cloudspaces. The details can be found on 1Password.
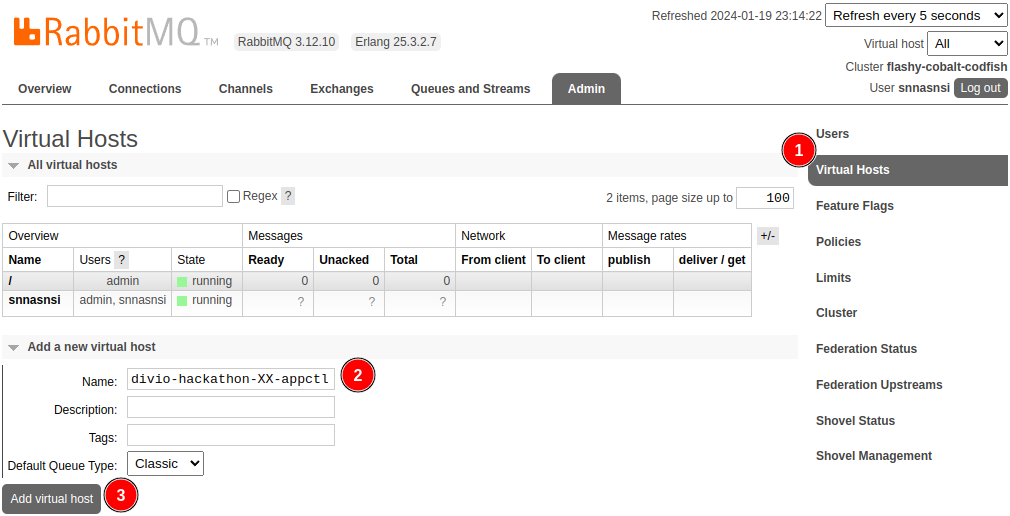
You will have to log into the RabbitMQ manager and add both a virtual host and
a user for the application controller. We usually name both <stack>-appctl,
but as all groups share the same stack name, place use
divio-hackathon-XX-appctl instead (while replacing XX with the
appropriate index).
Add a new virtual host:
And a new user with a strong generated password:
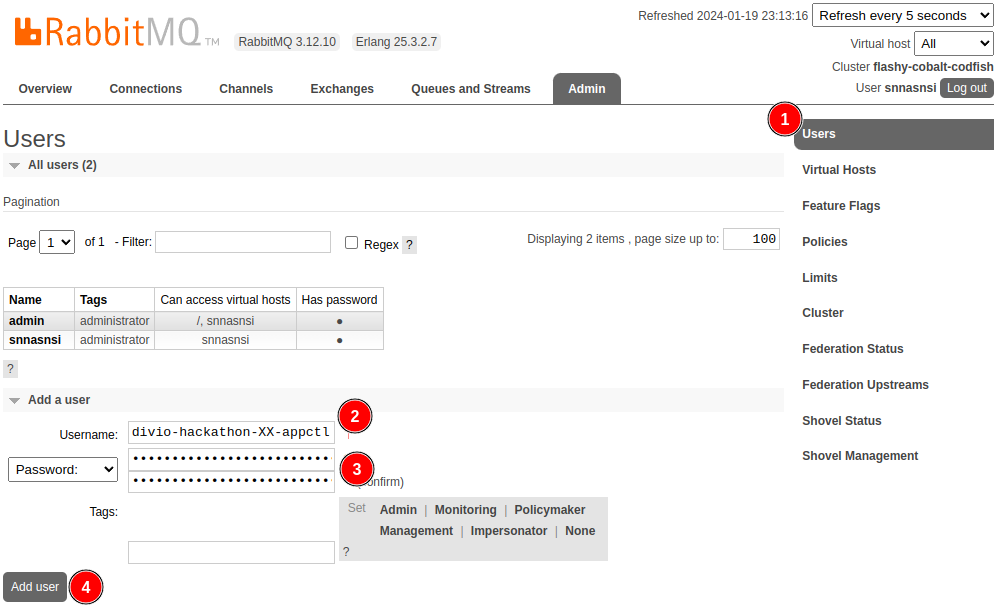
Note
You can use the generate-secrets <length> <count> command to generate
strong secrets.
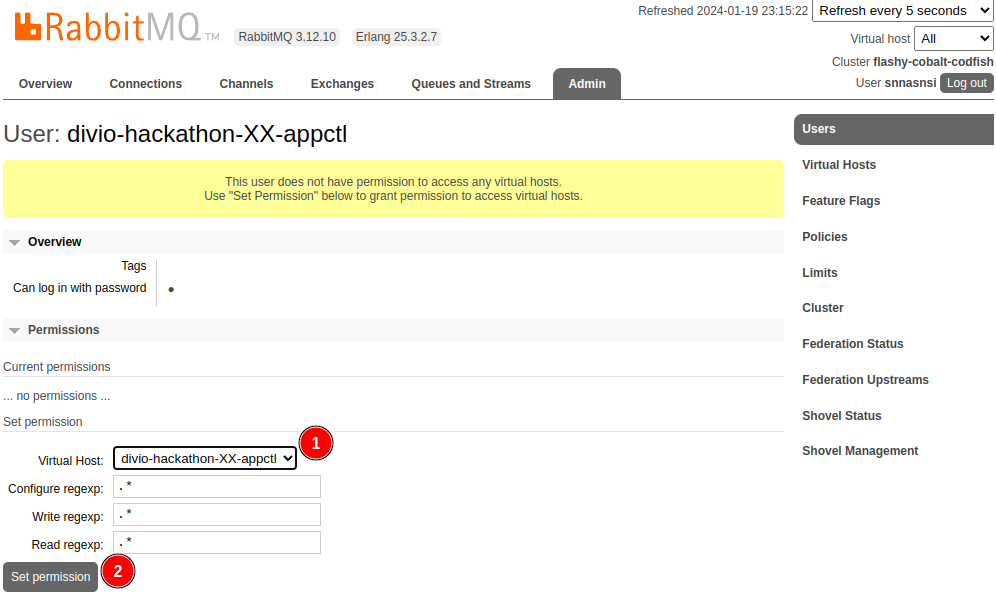
Once created, click on the username of the new user and grant full access to the virtual host:
You can now update the vault with two new values:
vault_amqp_cluster_dsn: <DSN from 1Password>
vault_appctl_rabbitmq_password: <generated password>
Finally, only because all groups are sharing the same RabbitMQ clusters, override the default value for the RabbitMQ user and vhost:
appctl_rabbitmq_user: divio-hackathon-XX-appctl
appctl_rabbitmq_vhost: divio-hackathon-XX-appctl
5.4. Storage Buckets#
Apart from a database and some message queues, the application controller also requires two buckets: one to store the uploaded source code tarballs, and a second one for the docker registry to store the built docker images.
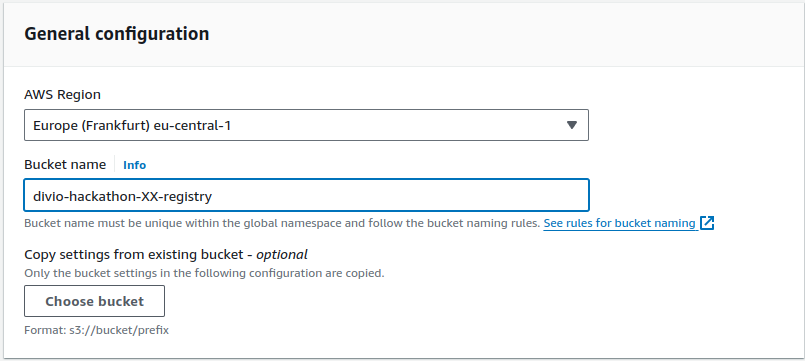
We will start with the bucket for the registry. Go ahead, open the S3 dashboard, and click on Create bucket. Make sure the correct region is selected and enter an appropriate name (bucket names are global, so make sure to use the index in the name):
You can leave all other settings set to their default values and click on Create bucket.
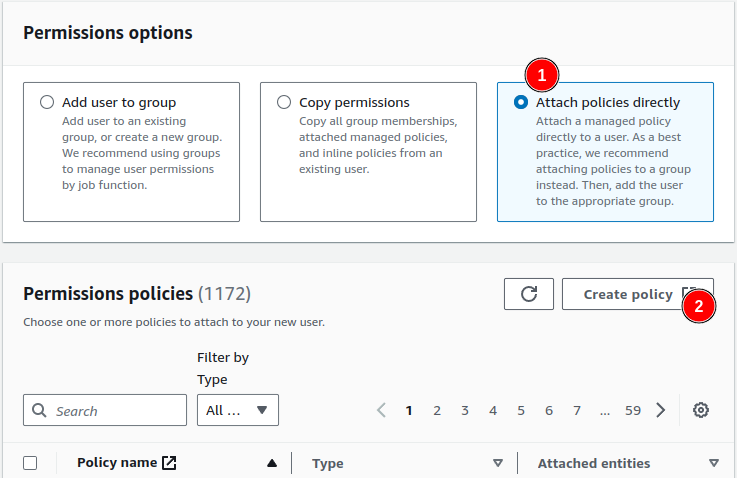
Next we will have to create an IAM user who is able to interact with this bucket. To do so head over to the IAM dashboard, select Users from the left sidebar, and click on Create user.
Enter the name of the bucket you just created for the username and click on Next. On the permissions screen select Attach policies directly and then click on Create policy:
A new tab or window will open with the policy editor. You can either create your policy visually or enter the JSON definition directly. Switch to the JSON editor and copy-paste the following policy into the field:
{
   "Version": "2012-10-17",
   "Statement": [
      {
            "Action": [
               "s3:ListBucket",
               "s3:ListAllMyBuckets",
               "s3:ListBucketMultipartUploads"
            ],
            "Effect": "Allow",
            "Resource": [
               "arn:aws:s3:::divio-hackathon-XX-registry"
            ],
            "Sid": "AllowListingFolder"
      },
      {
            "Action": [
               "s3:GetObject",
               "s3:PutObject",
               "s3:GetObjectAcl",
               "s3:PutObjectAcl",
               "s3:DeleteObject",
               "s3:AbortMultipartUpload",
               "s3:ListMultipartUploadParts"
            ],
            "Effect": "Allow",
            "Resource": [
               "arn:aws:s3:::divio-hackathon-XX-registry/*"
            ],
            "Sid": "AllowReadWriteObjects"
      }
   ]
}
Click on Next and enter a proper name such as DivioHackathonXXRegistryBucketAccess, then click on Create and close the tab.
On the user creation tab, you can now refresh the list of policies with the appropriate button in the top right corner of the box, search for the policy you just created, select it, and click on Next. On the summary screen click on Create user.
Finally, we have to create an AWS Access Key for the newly created user. Click on the username from the users listing page, switch to the Security credentials tab, and click on Create access key. Select Other as use case and click on Next, then on Create access key. Before continuing, make sure to note down the access key ID and the secret access key, as the latter one will not be visible again (you can already add the DSN to the vault as per the instructions below).
Repeat the same setup for divio-hackathon-XX-sources, by taking care of
replacing the name when creating the bucket, the user, and its policy.
You can now add the DSN for the two buckets to the vault in the following format:
vault_app_registry_storage: s3://<access-key-id>:<secret-access-key>@<bucket-name>.s3.<region>.amazonaws.com/?region=<region>
vault_appctl_sources_storage: s3://<access-key-id>:<secret-access-key>@<bucket-name>.s3.<region>.amazonaws.com/?region=<region>&acl=private&qs_auth=true
Note
If the secret access key contains unsafe URL characters, you have to
urlencode them (usually you can encounter / and +, which are encoded
as %2F and %2B, respectively.
5.5. Elasticsearch Cluster#
The last backing service required by the app controller (and by the Cloudspace itself) is an Elasticsearch cluster which is used to store logs and metrics for the managed applications.
Similarly as done for the RabbitMQ cluster, we currently use an external service provider to manage the Elasticsearch clusters for telemetry. For the purposes of this guide, a cluster is already set up and will be shared by all Cloudspaces. The details can be found on 1Password.
Edit your vault file and add the following values by getting the relevant
data from the 1Password entry:
vault_monitoring_elasticsearch_cloud_id: "<cloud id>"
vault_monitoring_elasticsearch_hosts: "<elasticsearch>"
vault_monitoring_elasticsearch_username: "<username>"
vault_monitoring_elasticsearch_password: "<password>"
vault_monitoring_elasticsearch_api_key: "<api key>"
Usually we use a single cluster for each Cloudspace, but as we are sharing an
instance across all groups, we need to make a small change to the defaults
vars file to properly namespace the data:
logging_application_name: "divio-hackathon-XX"
5.6. SSO Integration#
The various services running on a Cloudspace are accessed via SSO. We are currently using OneLogin as SSO solution for production services.
Each instance of an application to log in to has to first be set up on OneLogin; this can be done with the following command, but it requires you to be an administrator on OneLogin:
ddt create-onelogin-saml-app \
   --allow-devs \
   appctl.hackathon-XX.aldryn.net \
   'App Controller (Hackathon XX)'
If you are not an administrator on OneLogin, ask a colleague that is to create the application for you and let you know the output of the command; it will provide you with the values for the application ID and the entity UUID that you need to set below.
Note
It is necessary to trigger the Reapply All Mappings action from the OneLogin admin portal to ensure that users are correctly granted access to the newly created application.
Add the following values to the defaults var file:
appctl_saml_idp_app_id: "<OneLogin app ID>"
appctl_saml_idp_entity_id: "<OneLogin SAML entity UUID>"
5.7. Other Configuration Values#
We need to set the domain used by default to host websites. To do so, add the
following value to the defaults vars file:
appctl_base_domain: hackathon-XX.aldryn.io
We need four additional secret values. You can generate them with:
generate-secrets 64 4
And then add them to the vault file as well:
vault_app_registry_secret: <generated secret 1>
vault_appctl_redis_password: <generated secret 2>
vault_appctl_db_password: <generated secret 3>
vault_appctl_secret_key: <generated secret 4>
5.8. Provisioning the App Controller#
Before provisioning a new host for the app controller, we have to set up an
Elastic IP as we already did for the bastion host. For
this IP, we can use appctl.hackathon-XX.aldryn.net hostname. Remember to
create the Elastic IP and also the appropriate DNS record on DNSimple.
Now everything is ready for the app controller virtual machine to be provisioned:
ddt provision --deploy divio-hackathon appctl
5.9. Fix User Permissions#
Note
This is a good example of one of the many small issues to fix to be able to fully automate the setup of a new Cloudspace.
You should be able to navigate now to https://appctl.hackathon-XX.aldryn.net/admin/. The app controller should redirect you to OneLogin, but after logging in, you end up in a redirect loop.
This is because the app controller creates a new user upon the first login, but does not assign any permissions. This has to be fixed manually via SSH and a Django shell. You can enter a new shell with the following sequence of commandsL:
ssh divio-hackathon-appctl-00
cd /opt/appctl
dcr web ./manage.py shell
Once inside the Django shell, the following Python code will grant the necessary permissions to your user:
from django.contrib.auth.models import User
User.objects.update(is_staff=True, is_superuser=True)
You can now try to access the Django admin again and everything should work as expected.
5.10. Finalizing the Configuration#
Now that we got access to the Django admin, we have to perform some additional manual configuration actions.
We start with the creation of the default registry. You can do that through the
Django admin, or by issuing this command from with the /opt/appctl folder
on the app controller virtual machine:
dcr web ./manage.py create_registry \
   --generate-cert --default --enabled \
   https://app-registry-local.aldryn.net/v2/
From the Django admin, you have now to retrieve the UUID and save it to your
defaults vars file:
app_registry_uuid: "<uuid from the registry detail page>"
Furthermore, copy the certificate blob and dump it into
certs/divio-hackathon-registry-token-issuer/cert.pem. Once done, run the
move-certs command from within the deployment repository and you will see
that the certificate file has been moved within a subdirectory named after its
validity date.
To finalize the setup, we have to redeploy the appctl:
ansible-playbook -i platform/inventory/divio-hackathon \
   platform/app-controller.yml \
   --limit appctl --tags registry,appctl
Next we will require four users with API access:
runnersfor the app runners agent to announce themselves to the appctllbsfor the ingress controllers to announce themselves to the appctlsshfor the SSH proxies to spin up containers for SSH sessionscontrol-panelfor the control panel to manage and deploy applications
We do not have proper permissions management on the appctl API yet, so it is enough to create four new active users with a random password via the admin interface, complemented with an access token each.
Finally, save the four tokens in your vault:
vault_appctl_cp_token: <control-panel token>
vault_appctl_agents_token: <runners token>
vault_appctl_lbs_token: <lbs token>
vault_appctl_ssh_token: <ssh token>
Next up, configure a default log sink. Name it fluentd, mark it as default,
select the Fluentd driver and provide the following options:
{
   "tag": "app.{{.ID}}",
   "labels": "net.aldryn.app.name,net.aldryn.app.region,net.aldryn.app.process-type",
   "fluentd-address": "unix:///var/run/fluent/fluent.sock",
   "fluentd-sub-second-precision": "true"
}
As a last configuration option, just make sure that the site domain matches the
app controller domain. Head over to the Sites model and set both the display
and domain name to appctl.hackathon-XX.aldryn.net.
5.11. Conclusion#
That is “already” it. The application controller is one of the most complicated components to set up, but also because we introduce most of the backing services that power a Cloudspace during this phase.
In the next chapter, we will add some application runners so that we have a place to run the containers of the applications that we are going to deploy.